
SketchUp Essentials for Wall Decor Projects
Choosing the right SketchUp version and plugins
Across South Africa, 7 in 10 interior projects rely on 3D previews to win clients and justify decisions. This is where SketchUp Essentials for wall decor projects shines—choosing the right SketchUp version and plugins can turn inspiration into tangible wall statements.
For wall decor 3d model sketchup, the desktop Pro unlocks advanced import, export options, and precise measurement tools, while the free or web versions keep concepts moving. Size, hardware, and project scope should guide the choice; a faster machine benefits larger scenes with glass, frames, and textures.
Plugins can turn a simple model into a showroom-ready piece.
- Material libraries and realistic rendering
- Component libraries for frames and fixtures
- Section cuts and annotations to communicate impact
With careful version selection and tasteful plugin adoption, wall decor concepts reach clients with confidence and clarity across South Africa.
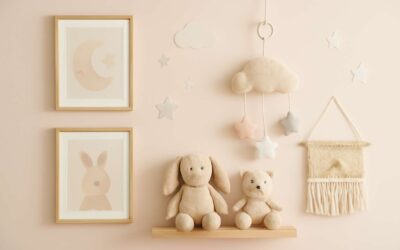
Setting up a wall decor project workspace
Across South Africa, 7 in 10 interior projects rely on 3D previews to win clients and justify decisions. For wall decor 3d model sketchup, the workspace becomes a quiet trickle of momentum—where inspiration finds a screen, a scale, and a system. A focused desk, a calibrated monitor, and a tidy archive for textures and components turn fleeting ideas into tangible wall statements that clients can imagine in their spaces.
Consider a few essentials that anchor the process without distracting from the art:
- Clean desktop and clear naming conventions for models and materials
- Reliable input devices and a view setup that keeps measurements honest
- Accessible libraries and reference boards for frames, fixtures, and glass
When the space hums with order, projects drift smoothly from concept to client-ready visuals in South Africa.
Understanding 3D modeling basics for interior design
In South Africa, 62% of interior decisions hinge on a crisp 3D preview, turning bold ideas into believable spaces. A single render can pull a client closer to the wall before a hammer is ever lifted.
SketchUp Essentials for wall decor projects lean on solid 3D modeling basics: clean geometry, honest scale, and a disciplined workflow. When you frame a concept with wall decor 3d model sketchup, the balance between form and proportion reveals itself.
- Set a consistent unit system to keep every element aligned
- Build with components to reuse frames, textures, and hardware
- Organize with layers and scenes for quick client previews
With a calm desk and a precise eye, ideas become client-ready visuals that translate across spaces in South Africa.
Exporting and preparing assets for printing or rendering
In South Africa, 62% of interior decisions hinge on a crisp 3D preview, and a single render can pull a client closer to the wall before a hammer is lifted. Exporting assets for printing or rendering is the quiet, meticulous finale of any wall décor concept.
With wall decor 3d model sketchup, you set the stage for print and screen. Exporting assets requires clear choices in color, resolution, and formats so your vision travels faithfully.
- Export high-res textures (300 DPI) in TIFF or PNG
- Embed ICC profiles (sRGB) for consistent color
- Deliver clean geometry and texture packs for renderers
Keep units disciplined and textures organized—separate maps, then reassemble in the final render. In South Africa’s design scene, these careful exports translate the designer’s hand into tangible, print-ready reality.
Design Concepts for 3D Wall Art in SketchUp
Modern geometric wall art ideas
Wall space is where ideas meet reality. In South Africa, homeowners increasingly treat walls as living statements rather than mere backdrops. A wall decor 3d model sketchup lets you test geometry, scale, and light before committing to materials. Geometry becomes a voice, not a constraint!
Here are modern geometric wall art ideas to explore in SketchUp:
- Modular hexagon mosaics that tessellate and catch shifting light
- Interlocking prisms creating adjusting shadows as you walk by
- Isometric stair-step panels that bring rhythm to a plain room
- Layered circular rings forming a subtle, dynamic focal point
These concepts translate to real spaces, letting clients imagine bold statements in entryways or lounges across Cape Town, Johannesburg, and Durban.
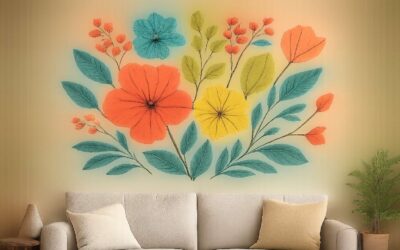
Nature-inspired 3D wall pieces
Nature-inspired 3D wall pieces in SketchUp invite light to narrate the room’s story. For South African interiors, where daylight spills across timber floors and clean walls, a wall decor 3d model sketchup helps sculpt mossy greens, wood grain, and wind-swept forms into tangible rhythm. Think vines curling along a panel or a bark-inspired relief that catches morning and evening shifts, turning a hallway into a forest edge.
- Veined leaf forms that echo light patterns
- Bark-inspired relief textures with tactile depth
- Blossom silhouettes and seed-pod shadows that shift with sun
These motifs translate to real spaces in Cape Town, Johannesburg, and Durban, anchoring a living wall of texture and air. By adjusting scale and depth in SketchUp, designers preview how the wall decor 3d model sketchup reads from different angles, ensuring the piece breathes rather than competes with lighting or furniture.
Abstract textures and relief designs
Design concepts for 3D wall art in SketchUp unfold like a whispered legend. Abstract textures and relief designs turn flat walls into portals where light folds and refracts. In South African spaces, the wall decor 3d model sketchup invites surfaces to breathe—oscillating between mossy greens, mineral gleam, and wind-carved curves that guide the eye along a living surface, not a frame.
Consider these motifs that translate into tactile rhythm:
- Micro-relief fields that catch light from every angle
- Topographic ridges guiding shadow across a wall surface
- Dynamic lattices that shift perception with viewing distance
From Cape Town to Durban, designers preview scale and depth in SketchUp, letting the wall decor 3d model sketchup breathe with architecture rather than compete with it.
Minimalist profiles for contemporary spaces
‘Less is more,’ is more than a cliché—it’s a living discipline in South Africa’s spaces. Minimalist profiles for contemporary spaces favour quiet geometry, tactile restraint, and walls that breathe rather than dominate. In this design language, wall decor 3d model sketchup acts as a co-creator, translating intention into surfaces responding to daylight. I’m drawn to the way depth and shadow sketch subtle rhythms across a room, turning flat façades into architectural dialogue that invites no loud fanfare, only attentive viewing.
Motifs that amplify space without shouting:
- Clean planes that catch light with a soft, even glow
- Monolithic profiles that read as one continuous form
- Subtle curvature and bevels to sculpt depth without excess
- Material-mimicking textures that stay restrained yet expressive
From Cape Town to Durban, designers preview scale and depth in SketchUp, letting minimalist forms breathe with architecture rather than compete with it.
Color theory and material finishes in 3D walls
In a climate where light is a language, especially in South Africa’s variegated daylight, color theory becomes the ballast of 3D expression. SketchUp lets color relationships breathe across walls, guiding 3D wall art toward harmony rather than shout. When designing for wall decor 3d model sketchup, you translate mood into swatches and depth, choosing complementary tones that read differently from dawn to dusk.
Material finishes in 3D walls become tactile rhetoric – velvet matte, satin, and resin sheens that catch daylight at precise angles. Pair finishes with color to sculpt depth, then let the model breathe. In this headspace, wall decor 3d model sketchup acts as co-creator, translating intention into tangible surfaces that glow with quiet intensity.
- Cool neutrals and soft whites to amplify daylight without glare
- Earthy textures that ground metallic accents and shadows
- Controlled gloss and subtle relief to sculpt depth
Modeling Techniques for Realistic Wall Decor in SketchUp
Creating accurate wall dimensions and placement
In interior visuals, 70% of viewers report that scale and placement determine whether a piece sings or falls flat. The wall decor 3d model sketchup approach turns rough sketches into believable, space-aware environments.
Accurate wall dimensions begin with real measurements, anchored reference planes, and a clean coordinate system that travels from corner to corner. A primary wall plane guides placement, while calibrated offsets keep frames aligned as light shifts across a Cape Town afternoon.
- Align with architectural features using guiding lines
- Verify proportions with site photos and metric measurements
- Consider how seating and lighting affect legibility
The result feels like a whispered invitation: spaces where art learns your walls’ language, and every piece finds its moment in the narrative of a home.
Extrusion vs. bezier curves for organic shapes
In interior visuals, 63% of viewers remember texture and form long after a tour. For wall decor 3d model sketchup, the decision between extrusion and bezier curves shapes the entire narrative—how a piece sits in light, shade, and space.
Extrusion gives crisp silhouettes, uniform thickness, and repeatable results. It suits modular frames and architectural panels where accuracy matters. In the wall decor 3d model sketchup workflow, you can build a solid frame with clean edges and dependable offsets to stay aligned as light shifts across a Cape Town afternoon.
- Edge alignment
- Light behavior
- Print and fabrication compatibility
Beziers, by contrast, bend constraints into organic forms. They produce fluid transitions, sculptural reliefs, and silhouettes that breathe with gravity. Bezier curves let you capture leaf-vein textures or wave-like wall art with controlled curvature. Organic shapes sing!
Applying textures, materials, and lighting
Texture is the scandalous trickster of interior design—the kind of mischief that outshines fancy angles! In interiors, 63% of viewers remember texture and light long after a tour. When we work with wall decor 3d model sketchup, textures and materials turn flat geometry into something that feels tangible, even before the paint dries.
We simulate realistic finishes by using UV mapping, smart material choices, and careful light setup. HDRI skies and warm-toned spotlights breathe life into shadows, letting a Cape Town afternoon play across seams and reliefs as if you could touch the breeze. This is where the model earns its keep, guiding fabric, stone, and plaster to behave under varied daylight.
- Match texture scale to wall size for believable proportions
- Use roughness and reflectivity to differentiate materials
- Balance light and shadow for depth without flattening forms
Using groups, components, and scene organization for batches
Bold shapes deserve a clean spine. In modeling wall decor, tidy structure matters! Groups keep geometry manageable, components let you reuse motifs without duplication, and scene organization speeds batch work. Tagging panels, reliefs, and frames as discrete elements lets you adjust mood across a project in minutes. When you frame a scene for render, the wall decor 3d model sketchup behaves like a living library, not a one-off file.
Naming, hierarchy, and a thoughtful scene tree turn a single piece into a scalable library. For batches, align scale and references so light plays across every variant with consistency. This disciplined approach keeps Cape Town light from flattening edges as shadows move.
- Group related elements for clarity
- Convert repeating details into components
- Organize scenes by wall zone or projection
Optimization and Rendering Workflows for Wall Decor in SketchUp
Performance tips for large 3D wall decor scenes
Performance can make or break a wall decor concept in SketchUp. In South Africa’s design studios, a clean, fast render often wins client confidence, with 68% reporting quicker approvals after the first pass. Optimization and rendering workflows for wall decor 3d model sketchup demand a careful balance between detail and speed, especially for expansive wall scenes. The aim is drama without bogging down the machine, revealing texture and light while staying responsive to tweaks.
To keep large scenes responsive, try these steps:
- Use instances and proxies for repeating wall elements to cut memory and draw calls.
- Compress textures to 1024–2048 px and enable linear color space to preserve detail without bloating RAM.
- Enable targeted render passes and clipping planes to focus compute where it matters most.
With disciplined workflows, you turn complexity into clarity, and the wall decor 3d model sketchup narrative remains compelling rather than overwhelming.
Rendering workflows: built-in vs extensions
In South Africa, a strong render can be the first handshake with a client. A recent industry note puts quicker approvals after the first pass at 68%. For wall decor 3d model sketchup projects, optimization is a design decision as deliberate as composition: drama without bogging down the machine, texture and light revealing themselves while staying responsive to tweaks.
Rendering workflows balance built-in speed with the richness of extensions. Built-in tools keep large scenes nimble during exploration; extensions like V-Ray or Enscape deliver photoreal lighting and materials that sing on real wall textures. Compress textures to 1024–2048 px and enable linear color space to preserve detail without bloating RAM, and use targeted render passes and clipping planes to focus compute.
- Built-in workflows: quick previews, lean memory
- Extensions: photoreal lighting and materials
- Hybrid approach: iterative layout plus final realism
Together, these choices turn complexity into clarity and keep the wall decor journey vivid without losing momentum.
Exporting models for 3D printing or laser cutting
In South Africa’s design studios, first impressions can seal the deal: 68% of clients approve after the first pass when renderings are polished. The room seems to hold its breath until the pixels align! Optimization isn’t an afterthought; it’s a design decision as deliberate as composition. For wall decor 3d model sketchup projects, balancing speed with detail lets textures and light reveal themselves while the interface stays responsive to tweaks.
Keep the pipeline lean and expressive with a few targeted steps:
- Compress textures to 1024–2048 px
- Enable linear color space to preserve detail
- Use targeted render passes and clipping planes to focus compute
These choices matter when exporting models for 3D printing or laser cutting, ensuring wall decor 3d model sketchup assets translate faithfully from screen to wall.
Documentation and client presentation: renders and sketches
In South Africa’s design studios, 68% of clients approve after the first pass when renderings are polished. The room seems to hold its breath until the pixels align, and the wall suddenly reads as if it were carved from light. For wall decor 3d model sketchup projects, optimization and rendering workflows quietly decide when a concept becomes a wall piece.
Documentation and client presentations live on renders and sketches that reveal texture and light while the interface remains responsive to subtle tweaks. The art is in balancing speed with detail—polish without pulling the frame into a tunnel of data.
- Texture fidelity versus memory footprint
- Linear color space preservation of tone and detail
- Targeted render passes and clipping planes to guide focus
When these choices align, wall decor 3d model sketchup assets translate faithfully from screen to wall.

0 Comments